


Urban Renovations Blog
Frost Heave Prevention for Retaining Walls in Appleton, WI
Peterson SEO • February 11, 2026 Urban Renovations | Appleton, WI | USA
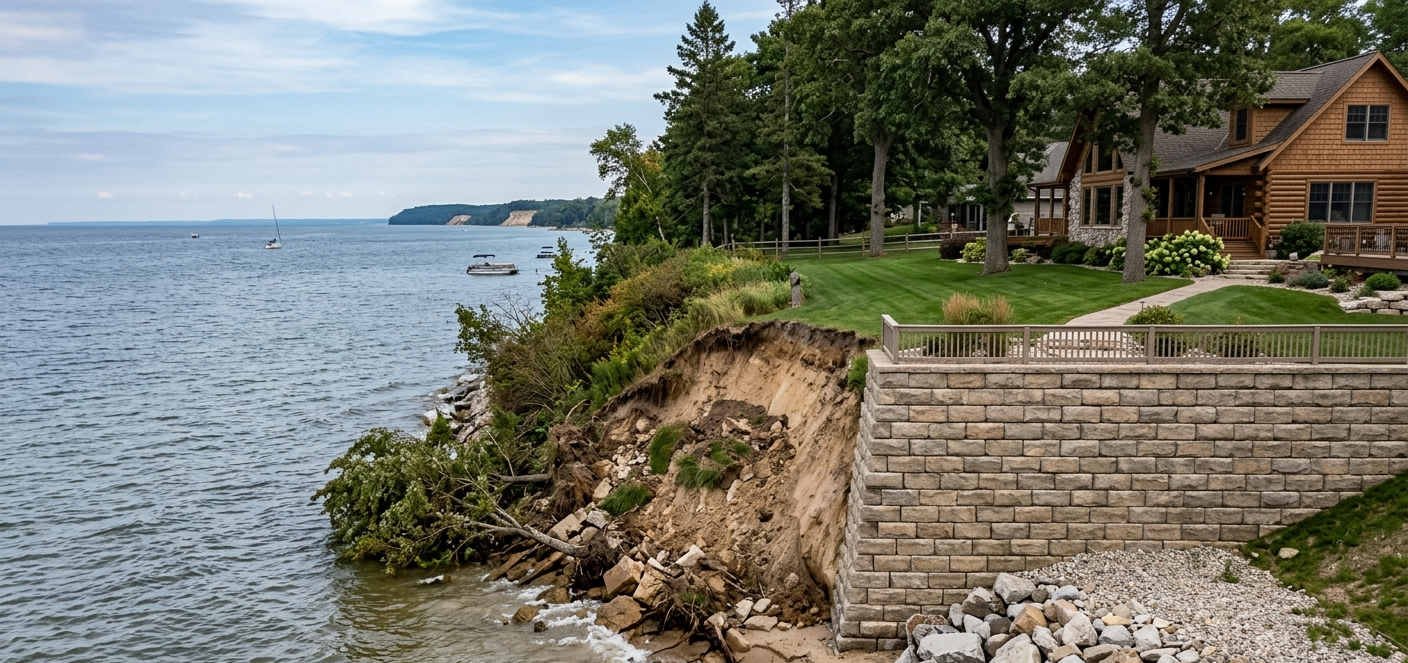
When a Retaining Wall Moves, It Rarely Starts with the Blocks

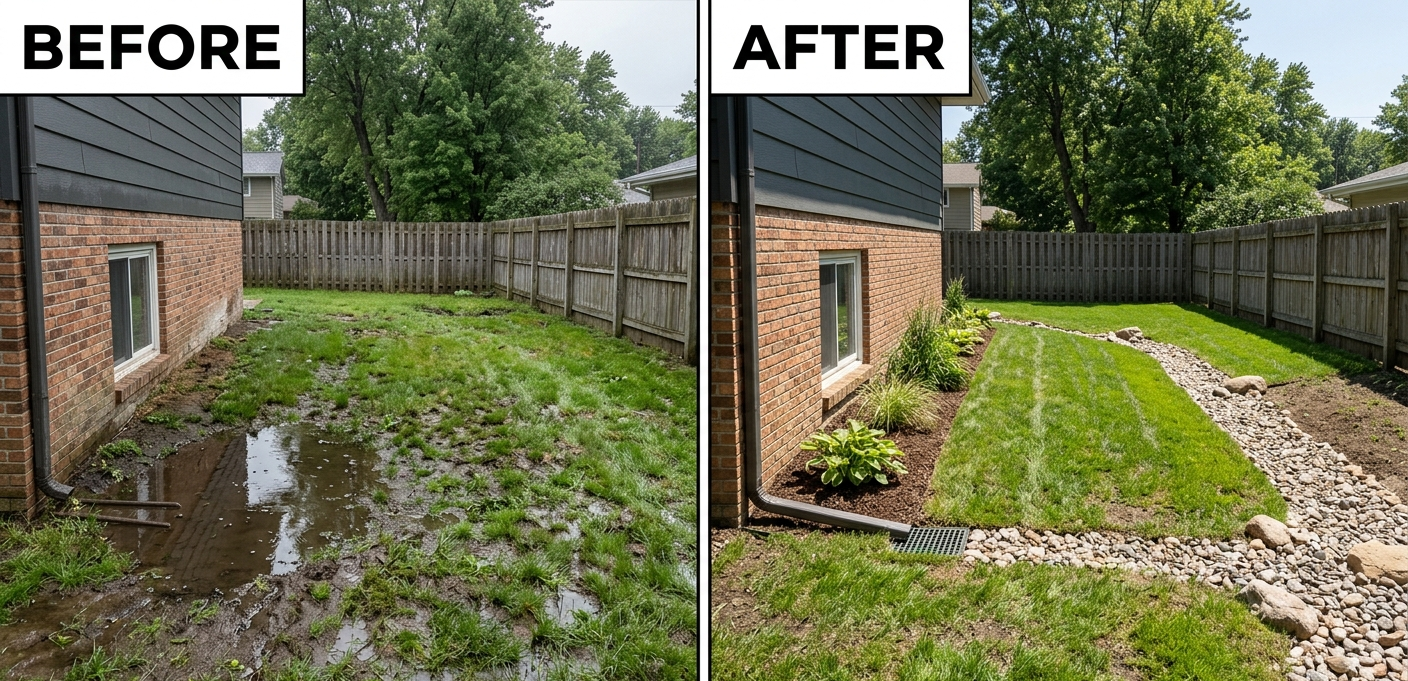
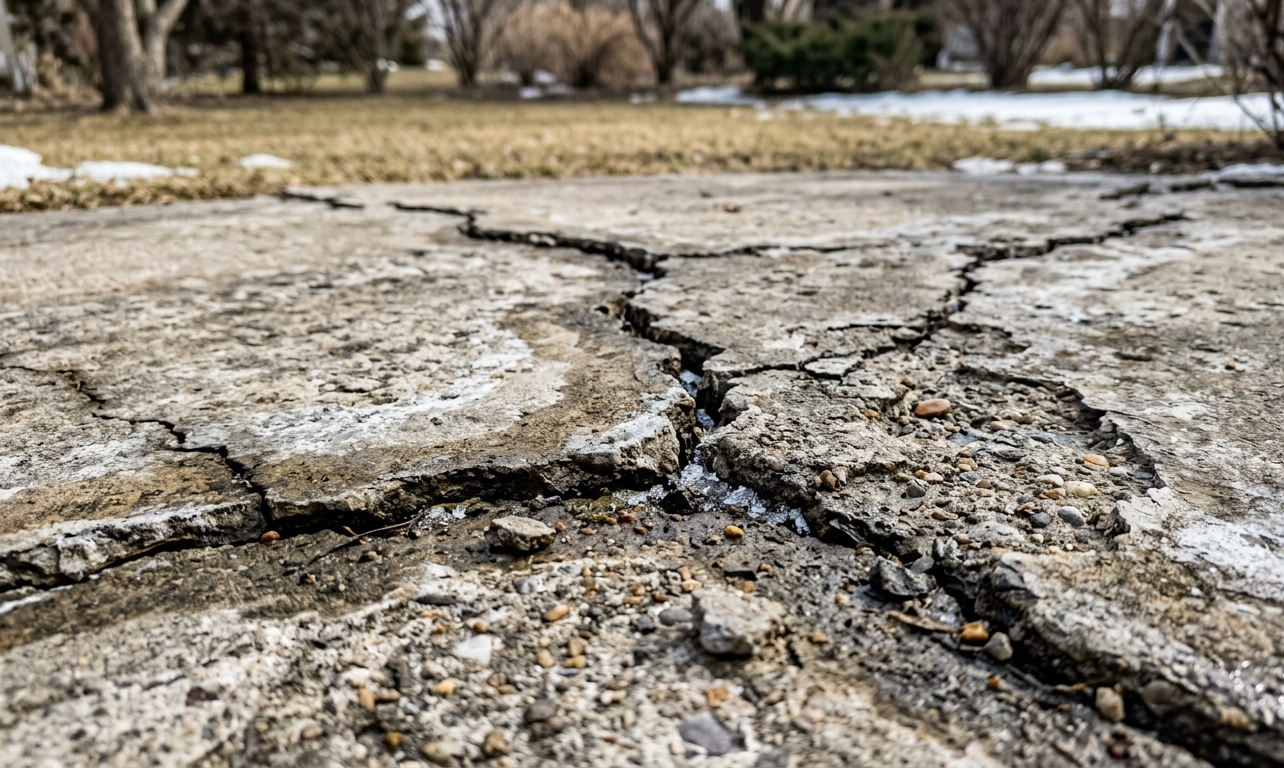
In Appleton and across the Fox Valley, a retaining wall can look perfect in July and then look a little suspicious by March. You might notice a slight bulge in the middle of the wall. Perhaps a cap stone no longer lines up perfectly with its neighbor. Maybe a corner feels like it is slowly trying to leave the yard and head toward the street. That shift is not bad luck. It is not because the wall blocks were "cheap" or the wrong color. Most of the time, the problem is water.
Wisconsin winters are not gentle, and our local clay soil makes the situation significantly worse. Clay holds water tighter than sandy soils do. When the temperature swings, that trapped moisture becomes a powerful geological force. If your wall is holding back wet soil all fall, and then a deep freeze sets in during January, the wall is basically being asked to resist pressure from two directions. It fights the weight of the soil pushing forward and the expansion of the ice pushing outward.
Failures can be prevented, but only if the wall is built like a drainage system first and a pretty landscaping feature second. That is the difference between a wall that lasts for decades and a wall that becomes a spring repair project three years later. As an experienced
Appleton retaining wall builder, we see this cycle of failure repeat every year, but the fix is all in the preparation.
The Short Answer: How to Prevent Frost Heave
Frost heave prevention for retaining walls comes down to one main goal, which is keeping water from sitting in the soil and stone behind the wall when winter hits. In Appleton, clay soil blocks drainage. This causes water to build up behind a wall, which adds immense weight. This buildup creates "hydrostatic pressure" that can push the wall forward slowly over time.
A reliable wall that resists this pressure includes four non-negotiable elements:
- A properly compacted aggregate base. This cannot be loose dirt or topsoil. It must be a structural foundation.
- A drain tile at the bottom. This is a perforated pipe that collects water and moves it away.
- A wide zone of clean drainage stone directly behind the blocks. This stone allows water to fall instantly to the pipe.
- A clear outlet path. The water needs a place to escape so it does not freeze in place.
According to industry standards from major manufacturers like
Keystone Retaining Wall Systems, controlling water is the single most critical factor in wall stability. When the wall stays dry behind the face, freeze-thaw cycles lose most of their power. When the wall stays wet, winter will eventually win. (See
Keystone Resources & Installation Guides).
A Fox Valley Story: The "Mystery" Lean
You can drive through neighborhoods in Appleton, Neenah, or Kimberly and see two retaining walls that look almost identical from the sidewalk. They use the same style of textured blocks. They have the same cap color. They are the same height. Yet, one still looks straight and plumb after ten years, while the other has that subtle "belly" in the middle or a top row that leans out over the driveway.
Homeowners often assume one company used better blocks or stronger glue. The real difference is almost always underground where you cannot see it. The Fox Valley’s heavy red clay holds moisture like a sponge. That matters because fall rain and melting snow do not just disappear into the ground the way they might in sandy soil. When the soil behind a wall stays saturated, the wall is holding back a much heavier load than it was designed for, and the pressure builds.
This is why any reputable retaining wall contractor Appleton homeowners hire should talk about "hydrostatic pressure" during the estimate. In plain terms, you are not just building a wall. You are building a controlled escape route for water before it freezes.
If you have been researching how deep footings should be in our climate, you already know frost movement is real, and code-level frost depth is not something to guess at. Retaining walls function differently than deck footings, but the enemy, frozen water in the soil, is exactly the same.
What is Actually Moving Your Wall?
Frost heave is the headline everyone talks about, but most wall failures in Appleton start with water pressure long before the ground freezes. When water cannot drain, it builds up behind the wall and pushes forward. Clay makes that worse because it slows down natural infiltration. This means the water hangs around longer after a rainstorm.
Frost heave then adds a second, more violent punch. When the water trapped in the soil freezes, it expands by about 9%. If that expansion happens inside the "reinforced zone" directly behind your wall, it can lift or shift the entire structure. If the soil under the wall freezes and expands, it can lift the base, causing the wall to tip.
Industry guidance for segmental retaining wall systems consistently emphasizes using proper drainage materials and avoiding soils with higher frost heave potential, like our local clay, directly behind the wall face. In other words, you do not "fight frost" with heavier blocks or more glue. You reduce frost impact by keeping the drainage zones bone dry.
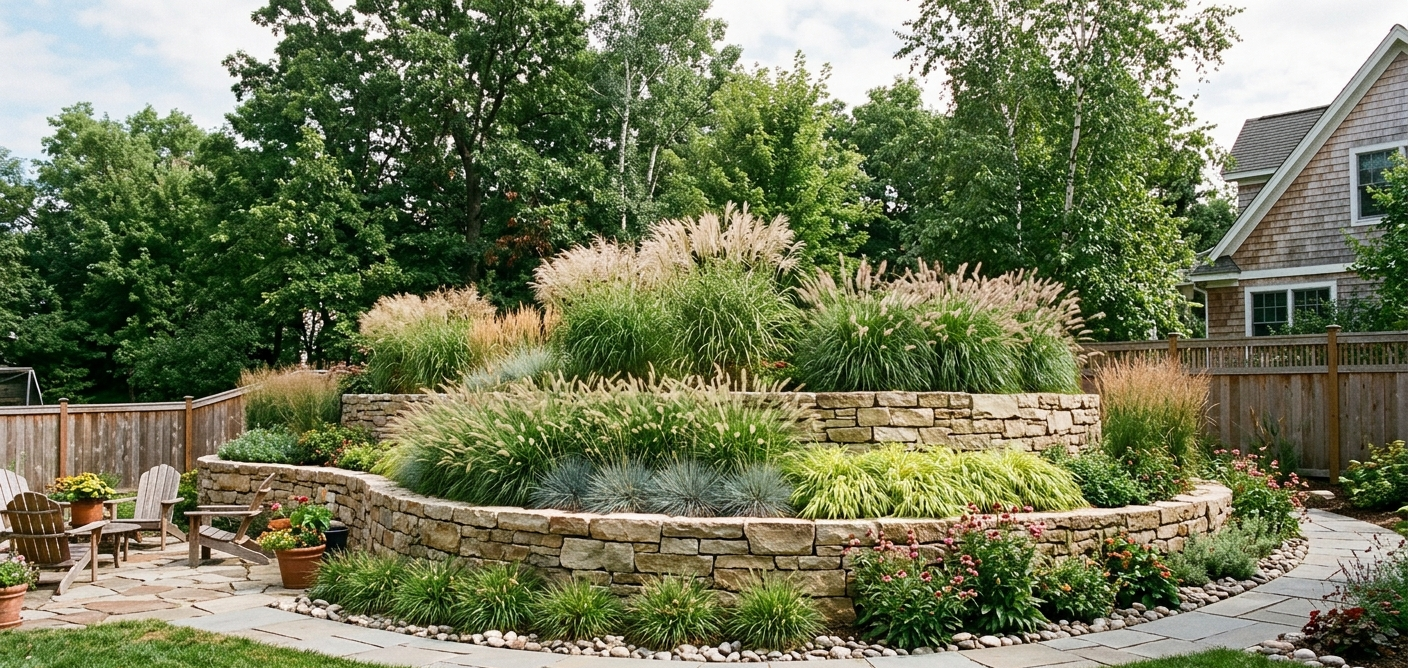
The Fix: Build a Drainage System, Not Just a Wall
When you install retaining wall Appleton projects, the longevity of the build is determined by three hidden layers. Each layer plays a specific role in managing moisture and preventing the wall from becoming a casualty of winter.
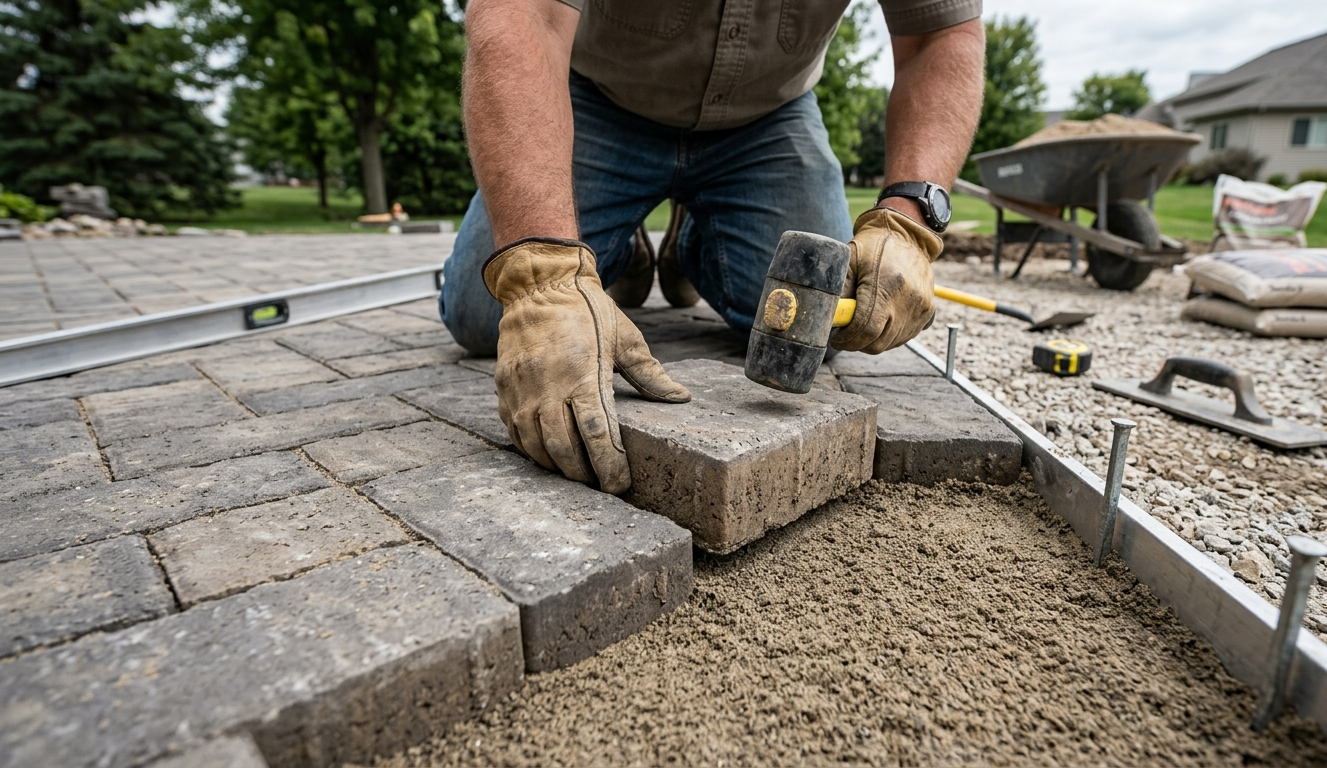
1. The Base: The Foundation of Stability
This is not the place for loose fill or topsoil. A wall must sit on a compacted aggregate leveling pad. In our area, this usually involves excavating a trench, lining it with geotextile fabric to prevent clay from mixing in, and filling it with dense-graded base material. This base must be compacted with a heavy-duty plate compactor, not just tampered by hand. If the base holds water or settles, the frost will heave the wall from underneath, causing the entire structure to tilt forward.
2. The Drainage Column: The Clay Buffer
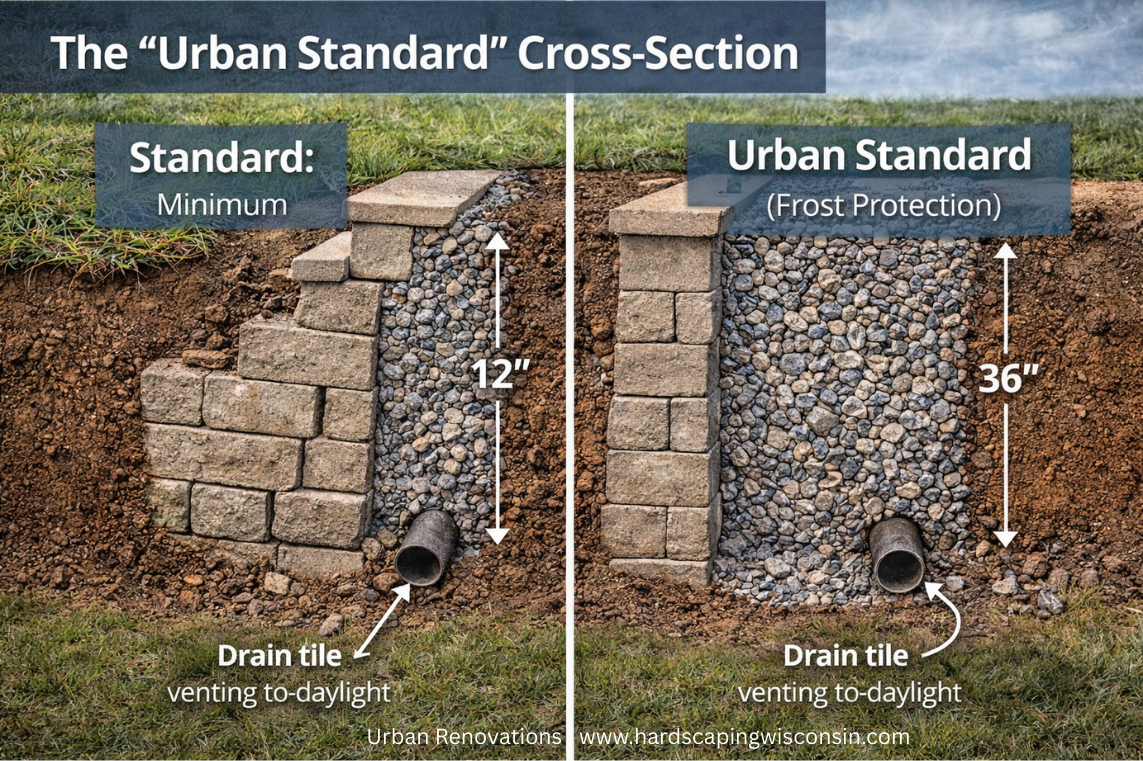
This is where Appleton walls either last or fail. You want clean stone directly behind the blocks. Clean stone means gravel that has no dust or "fines" in it. It allows water to fall instantly to the pipe at the bottom. Local research suggests an "Urban Standard" of using 36 inches of clean drainage stone backfill rather than the common industry minimum of 12 inches. That larger drainage column acts as a buffer. It keeps the wet, expansive clay far away from the blocks. If the clay expands, it pushes against the stone buffer, not the wall face.
3. The Outlet: The Exit Strategy
You need a drain pipe at the base, commonly called drain tile. However, a pipe with nowhere to go is just a long bucket that holds water. It must have a "daylight" outlet or connect to a drainage system. We often see failed walls where the contractor installed a pipe but capped both ends or buried them without an exit. That traps water exactly where you do not want it. The pipe must slope efficiently to a low point in the yard or a catch basin so the water leaves the system entirely.
If you are already comparing permeable vs. standard pavers, you have seen this theme before. Drainage is not a nice bonus. It is the foundation of performance in Wisconsin.
Control Surface Water: Don't Feed the Beast
Even a well-built wall can suffer if surface water is directed toward it. We often see gutters that dump water right at the top of the wall. We see patio runoff that funnels directly into the backfill zone. We see low spots that pond water near the cap of the wall. All of these scenarios create extra saturation behind the blocks.
In Appleton, that extra water does not disappear quickly in clay soil. It lingers. It adds pressure. Then it freezes. If you want frost heave prevention, you have to think beyond the wall and look at the entire water path across the yard.
You must grade the soil at the top of the wall to slope away from the blocks. You should bury downspout lines and run them past the wall, ensuring roof water never enters the reinforced zone. A patio base that drains and a retaining wall system that drains work together because both are trying to solve the same winter problem.
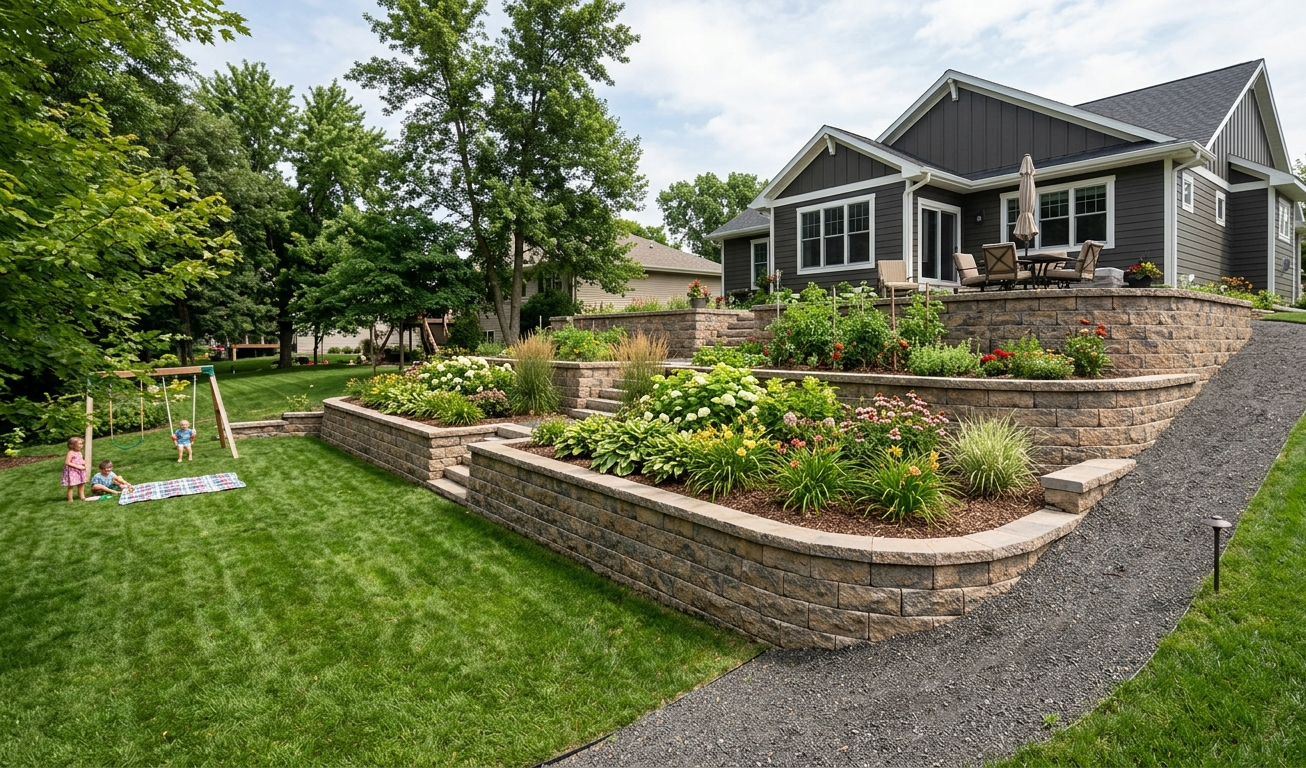
When Geogrid Matters: The Invisible Strength
If your wall is low, such as a garden bed wall under two feet, it may function as a simple "gravity wall." This means it relies on its own weight and setback to hold back the soil. As walls get taller, typically over 3 or 4 feet, the weight of the soil behind them increases significantly.
This is where geogrid reinforcement becomes part of a safe design. Geogrid is a high-strength synthetic mesh laid between the block layers and extending back into the soil. It ties the blocks and the soil together into one large, stable mass. It relies on friction and weight to lock the wall into the earth.
Technical guidance from manufacturers like Allan Block explains that reinforcement layers work with the backfill to resist sliding and overturning. (See Allan Block Water Management). In real life, that means a taller wall in Appleton should never be quoted as "just stack blocks and backfill with dirt." If the plan does not mention reinforcement where needed, you are taking a risk with Wisconsin winters.
Why Clay Soil Demands Better Backfill
A common mistake in the Fox Valley is using the native clay soil to backfill right up against the blocks. Contractors do this to save money on hauling stone. However, clay is "cohesive," meaning it sticks together, but it is also expansive.
When clay gets wet, it swells. When it dries, it shrinks and cracks. This movement creates gaps behind the wall where water can rush in, followed by periods of intense pressure when the clay expands again.
To prevent this, we must import "structural fill" or clean stone. This material does not swell when wet. It does not shrink when dry. It creates a stable, predictable mass behind the wall that protects the blocks from the chaotic movement of the native clay. This is an added cost during construction, but it is the primary reason why engineered walls stay straight while "budget" walls eventually lean.
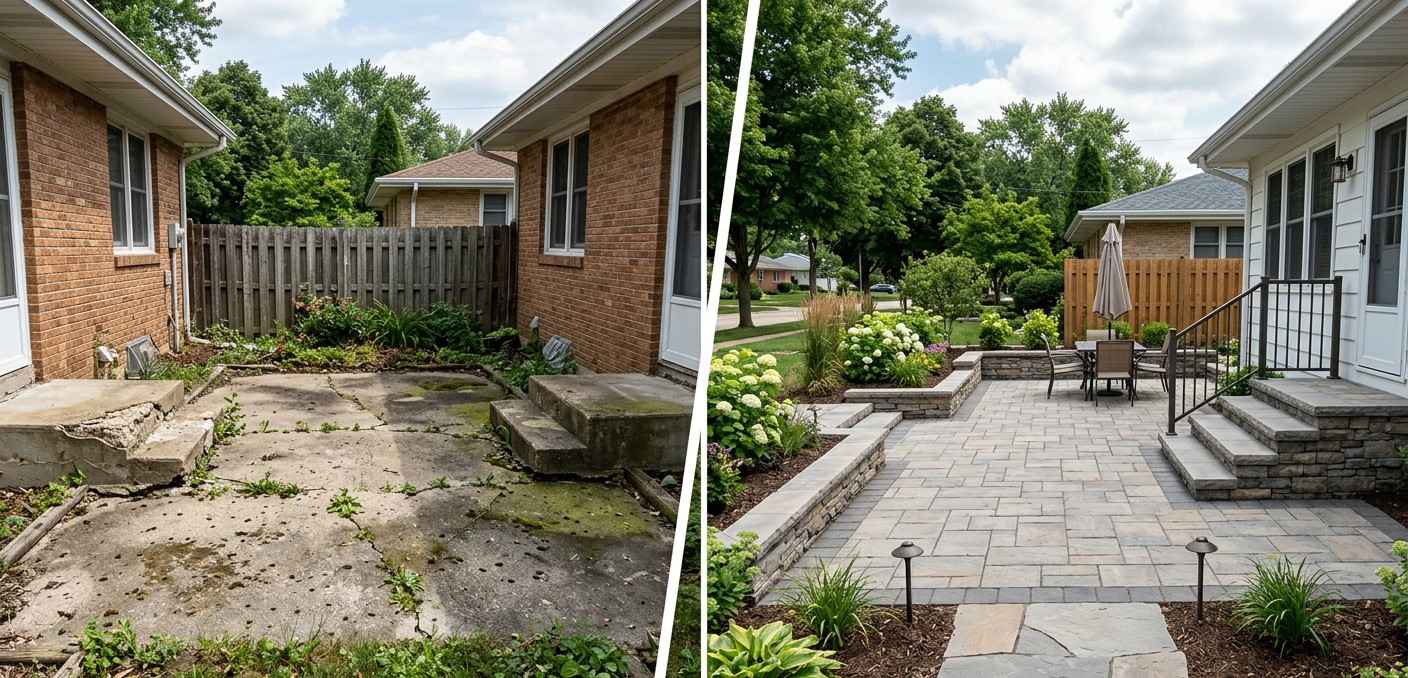
The Hidden Cost of "Good Enough"
We understand that budget is always a factor. However, fixing a failed retaining wall is vastly more expensive than building it correctly the first time. To fix a wall that has heaved, you typically have to take the entire wall down. You have to remove the backfill. You have to fix the base. Then you have to rebuild it all with new drainage materials.
Essentially, you pay for the wall twice, plus the cost of demolition. When you look at quotes, pay attention to the details about drainage stone volume and drain tile. A quote that is 20% cheaper often leaves out 50% of the drainage protection. In a climate like ours, that is a gamble that rarely pays off.
Frequently Asked Questions
Do all retaining walls in Appleton need a drain tile?
Most retaining walls in Appleton benefit from a drain tile, even small ones, because clay soil holds water and creates pressure. If a quote never mentions drainage or drain tile, you should ask why. A drain tile only works if it has a real outlet path, so it should be planned with where the water will discharge. In our area, omitting this often leads to leaning walls within a few seasons. Even for shorter walls, a drain tile is cheap insurance compared to the cost of resetting the blocks later.
How can I tell if my wall is failing from frost heave?
Early signs usually show up as small changes that slowly grow. Caps that no longer sit flat, vertical gaps that open up between blocks, or a slight bulge in the lower third of the wall are common indicators. In winter, you might notice ice forming on the face of the wall, which hints that water is trapped inside and squeezing out through the cracks. In Appleton clay, wall movement is often tied to hydrostatic pressure, which is water buildup behind the wall, making the frost heave worse.
Can I backfill my retaining wall with the dirt I dug out?
In many Appleton yards, the dirt you dig out is heavy clay. Never use clay directly behind a retaining wall. Clay holds water and swells. Any retaining wall contractor Appleton trusts will haul away that clay and import clean, angular drainage stone to place directly behind the blocks. This stone allows water to drop to the drain tile immediately, keeping the pressure off the wall. Using clay backfill is the number one cause of wall failure in our region.
Do I need geogrid for my retaining wall?
Geogrid depends on wall height, slope, and soil conditions. Generally, walls under 3-4 feet might not need it, but walls supporting a driveway, patio, or heavy slope almost certainly will. If you park a car above the wall, or if the yard slopes up away from the wall, the load is much higher. A good Appleton retaining wall builder will not guess; they will follow the manufacturer's engineering charts or hire an engineer for tall walls to determine exactly where the grid needs to go.
How Urban Renovations Can Help
If you want a retaining wall that stays straight through Wisconsin winters, the plan has to be about water first. That is exactly how Urban Renovations approaches hardscaping projects. Clay soil and freeze-thaw cycles punish shortcuts.
When you hire us, you will hear clear language about drainage stone, drain tile, and reinforcement, not just vague promises. Our process is built around engineered stability, designed to drain before winter arrives. We excavate the clay, install the proper base, and ensure the water has a way out.
If you are ready to install retaining wall Appleton neighbors will envy for years to come, let's talk. We can look at your slope, map your water paths, and build a system that fits your yard and your budget.
Contact Urban Renovations for a Site Assessment
About Urban Renovations
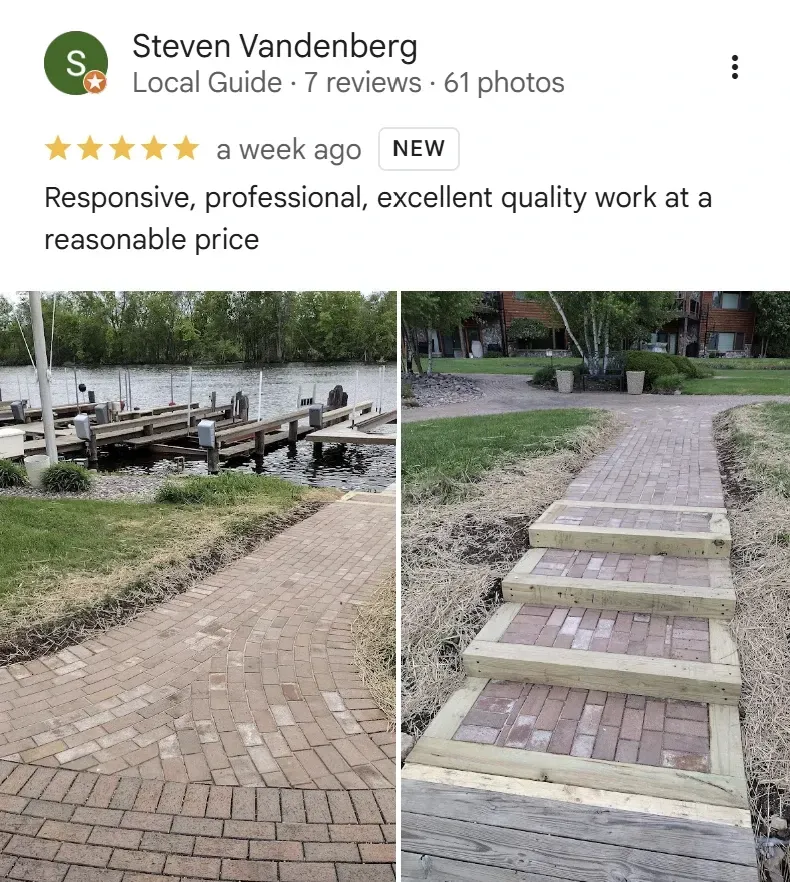
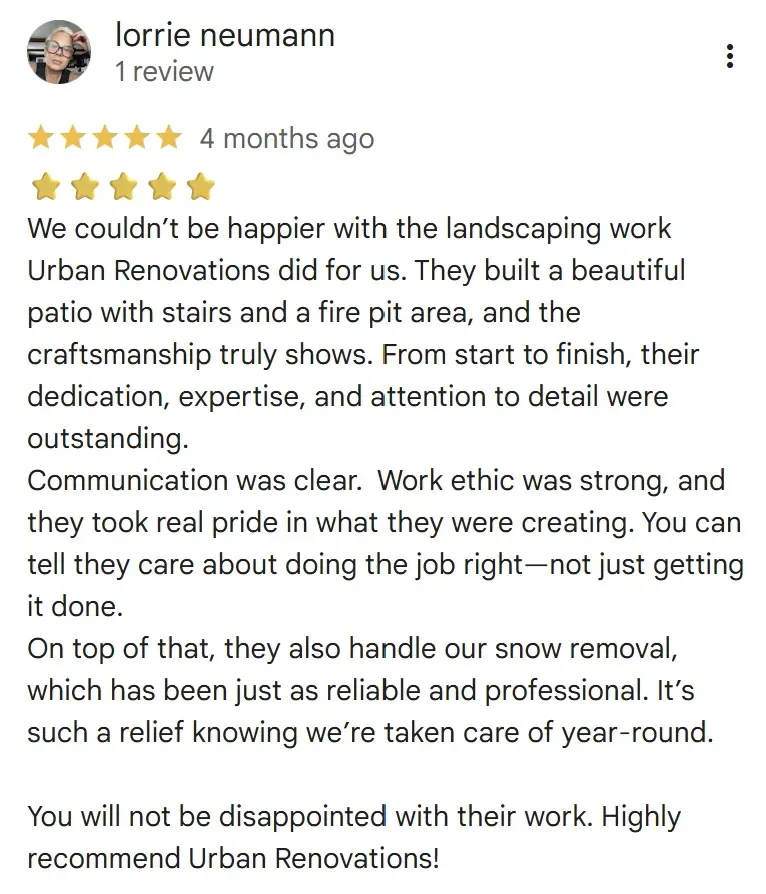
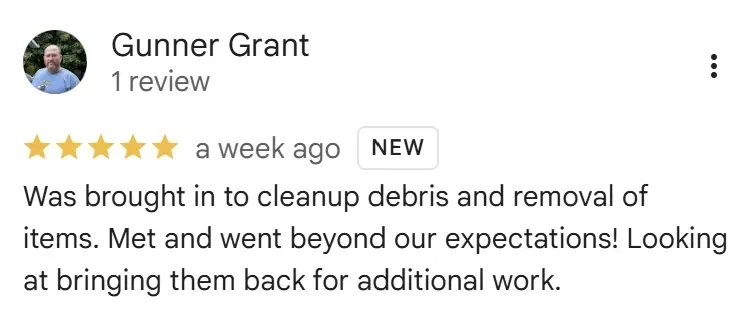
Urban Renovations is Central Wisconsin’s one stop team for hardscaping and landscaping, built around clean craftsmanship and a smooth experience from start to finish. They handle everything from paver patios, retaining walls, pergolas, and outdoor kitchens to grading, lawn installation, planting, and drainage that keeps your yard looking right and working right. Their 3D design process helps homeowners see the plan before work begins, so decisions feel confident and surprises stay off the jobsite. From the first conversation to the final walkthrough, their crew keeps communication clear, timelines realistic, and results built to last.

Ready to transform your outdoor space?
Trusted Local Team • Design and Build • Licensed and Insured • Year Round Service
From complete yard makeovers and hardscape installations to mowing and seasonal cleanups, we help Wisconsin homeowners get it done right. Call 920-250-8075 or submit the form below to get started.
Contact Us
Ready to Upgrade Your Outdoor Space?
If you are thinking about a new patio, retaining wall, pergola, or a fresh lawn install, our team is here to help you plan it right and build it to last. Reach out to Urban Renovations to talk through your goals, get expert guidance, and take the next step toward a clean, functional outdoor space you will enjoy for years.
Follow Us
Get A Free Quote Today!